Flutter: Hiểu về các ràng buộc

Khi ai đó đang học Flutter hỏi bạn tại sao một số widget với width:100 không rộng 100 pixel, câu trả lời mặc định là yêu cầu họ đặt widget đó vào bên trong một Center, phải không?
Đừng làm vậy.
Nếu bạn làm vậy, họ sẽ quay lại nhiều lần, hỏi tại sao một số FittedBox không hoạt động, tại sao Column bị tràn hoặc IntrinsicWidth gì được cho là đang làm.
Thay vào đó, trước tiên hãy nói với họ rằng bố cục Flutter rất khác với bố cục HTML (có thể là nơi chúng xuất phát), và sau đó yêu cầu họ ghi nhớ quy tắc sau:
Ràng buộc đi xuống. Kích thước tăng lên. Cha thiết lập vị trí.
Không thể thực sự hiểu được bố cục Flutter nếu không biết quy tắc này, vì vậy các nhà phát triển Flutter nên tìm hiểu nó sớm.
Chi tiết hơn:
- Một widget có các ràng buộc riêng từ cha của nó. Có một ràng buộc chỉ là một tập hợp của 4 đôi: tối thiểu và chiều rộng tối đa, và tối thiểu và chiều cao tối đa.
- Sau đó, widget đi qua danh sách con của chính nó. Từng con một, widget con biết những ràng buộc của chúng (có thể khác nhau đối với từng con), sau đó hỏi từng con xem nó muốn có kích thước như thế nào.
- Sau đó, widget định vị các con của nó (theo chiều ngang ứng trục x và theo chiều dọc ứng với trục y), từng con một.
- Và cuối cùng, widget nói với cha của nó về kích thước của chính nó (tất nhiên là trong các ràng buộc ban đầu).
Ví dụ: nếu một widget đã soạn chứa một cột có một số khoảng đệm và muốn bố trí hai phần tử con của nó như sau:

Thì việc "thương lượng" sẽ diễn ra như sau:
Widget: "Này cha, những ràng buộc của tôi là gì?"
Cha: "Con phải là từ 80 đến 300 pixel độ rộng, và 30 đến 85 độ cao."
Widget: "Hừm, vì tôi muốn có 5pixel đệm nên con tôi có thể có nhiều nhất 290pixel chiều rộng và 75pixel chiều cao.”
Widget : “Này đứa con đầu lòng, con phải là từ 0 đến 290 pixel chiều rộng, và 0 đến 75 chiều cao.”
Con đầu tiên : “Được rồi, tôi muốn có 290pixel chiều rộng và 20pixel chiều cao.”
Widget : “Hmmm, vì tôi muốn đặt đứa con thứ hai của mình bên dưới đứa con thứ nhất, điều này chỉ để lại 55pixel chiều cao cho đứa con thứ hai của tôi”.
Widget : “Này đứa con thứ hai, con phải là từ 0 đến 290 rộng, và 0 đến 55 cao.”
Con thứ hai : "OK, tôi muốn 140pixel rộng 30pixel cao."
Widget : “Rất tốt. Đứa con đầu tiên của tôi có chức vụ x: 5 và y: 5, và đứa con thứ hai của tôi có x: 80 và y: 25.”
Widget : “Này cha mẹ, tôi đã quyết định rằng kích thước của tôi sẽ là 300pixel chiều rộng và 60pixel chiều cao.”
Hạn chế
Do quy tắc bố cục được đề cập ở trên, công cụ bố cục của Flutter có một số hạn chế quan trọng:
- Một widget chỉ có thể quyết định kích thước của chính nó trong các ràng buộc do cha của nó đưa ra. Điều này có nghĩa là một widget thường không thể có bất kỳ kích thước nào mà nó muốn.
- Một widget không thể biết và không quyết định vị trí của chính nó trên màn hình, vì chính cha của widget là người quyết định vị trí của widget.
- Vì kích thước và vị trí của cha, đến lượt nó, cũng phụ thuộc vào chính cha của nó, nên không thể xác định chính xác kích thước và vị trí của bất kỳ widget nào mà không xem xét toàn bộ cây.
- Nếu một con muốn một kích thước khác với kích thước của nó và cha không có đủ thông tin để căn chỉnh nó, thì kích thước của con có thể bị bỏ qua. Hãy cụ thể khi xác định sự liên kết.
Ví dụ
Để có trải nghiệm tương tác, hãy sử dụng ví dụ sau:
import 'package:flutter/material.dart';
void main() => runApp(HomePage());
const red = Colors.red;
const green = Colors.green;
const blue = Colors.blue;
const big = const TextStyle(fontSize: 30);
//////////////////////////////////////////////////
class HomePage extends StatelessWidget {
@override
Widget build(BuildContext context) => FlutterLayoutArticle(<Example>[
Example1(),
Example2(),
Example3(),
Example4(),
Example5(),
Example6(),
Example7(),
Example8(),
Example9(),
Example10(),
Example11(),
Example12(),
Example13(),
Example14(),
Example15(),
Example16(),
Example17(),
Example18(),
Example19(),
Example20(),
Example21(),
Example22(),
Example23(),
Example24(),
Example25(),
Example26(),
Example27(),
Example28(),
Example29(),
]);
}
//////////////////////////////////////////////////
abstract class Example extends StatelessWidget {
String get code;
String get explanation;
}
//////////////////////////////////////////////////
class FlutterLayoutArticle extends StatefulWidget {
final List<Example> examples;
FlutterLayoutArticle(this.examples);
@override
_FlutterLayoutArticleState createState() => _FlutterLayoutArticleState();
}
//////////////////////////////////////////////////
class _FlutterLayoutArticleState extends State<FlutterLayoutArticle> {
int count;
Widget example;
String code;
String explanation;
@override
void initState() {
count = 1;
code = Example1().code;
explanation = Example1().explanation;
super.initState();
}
@override
void didUpdateWidget(FlutterLayoutArticle oldWidget) {
super.didUpdateWidget(oldWidget);
var example = widget.examples[count - 1];
code = example.code;
explanation = example.explanation;
}
@override
Widget build(BuildContext context) {
return MaterialApp(
debugShowCheckedModeBanner: false,
title: 'Flutter Layout Article',
home: SafeArea(
child: Material(
color: Colors.black,
child: FittedBox(
child: Container(
width: 400,
height: 670,
color: Color(0xFFCCCCCC),
child: Column(
crossAxisAlignment: CrossAxisAlignment.center,
children: [
Expanded(
child: ConstrainedBox(
constraints: BoxConstraints.tightFor(
width: double.infinity, height: double.infinity),
child: widget.examples[count - 1])),
Container(
height: 50,
width: double.infinity,
color: Colors.black,
child: SingleChildScrollView(
scrollDirection: Axis.horizontal,
child: Row(
mainAxisSize: MainAxisSize.min,
children: [
for (int i = 0; i < widget.examples.length; i++)
Container(
width: 58,
padding: const EdgeInsets.only(left: 4.0, right: 4.0),
child: button(i + 1)),
],
),
),
),
Container(
child: Scrollbar(
child: SingleChildScrollView(
key: ValueKey(count),
child: Padding(
padding: const EdgeInsets.all(10.0),
child: Column(
children: <Widget>[
Center(child: Text(code)),
SizedBox(height: 15),
Text(explanation,
style: TextStyle(
color: Colors.blue[900], fontStyle: FontStyle.italic)),
],
),
)),
),
height: 273,
color: Colors.grey[50]),
],
),
),
)),
),
);
}
Widget button(int exampleNumber) => Button(
key: ValueKey('button$exampleNumber'),
isSelected: this.count == exampleNumber,
exampleNumber: exampleNumber,
onPressed: () {
showExample(
exampleNumber,
widget.examples[exampleNumber - 1].code,
widget.examples[exampleNumber - 1].explanation,
);
},
);
void showExample(int exampleNumber, String code, String explanation) => setState(() {
this.count = exampleNumber;
this.code = code;
this.explanation = explanation;
});
}
//////////////////////////////////////////////////
class Button extends StatelessWidget {
final Key key;
final bool isSelected;
final int exampleNumber;
final VoidCallback onPressed;
Button({
this.key,
this.isSelected,
this.exampleNumber,
this.onPressed,
}) : super(key: key);
@override
Widget build(BuildContext context) {
return TextButton(
style: TextButton.styleFrom(
primary: Colors.white,
backgroundColor: isSelected ? Colors.grey : Colors.grey[800],
),
child: Text(exampleNumber.toString()),
onPressed: () {
Scrollable.ensureVisible(
context,
duration: Duration(milliseconds: 350),
curve: Curves.easeOut,
alignment: 0.5,
);
onPressed();
});
}
}
//////////////////////////////////////////////////
class Example1 extends Example {
final String code = 'Container(color: red)';
final String explanation = 'The screen is the parent of the Container, '
'and it forces the Container to be exactly the same size as the screen.'
'\n\n'
'So the Container fills the screen and paints it red.';
@override
Widget build(BuildContext context) {
return Container(color: red);
}
}
//////////////////////////////////////////////////
class Example2 extends Example {
final String code = 'Container(width: 100, height: 100, color: red)';
final String explanation = 'The red Container wants to be 100x100, but it can\'t, '
'because the screen forces it to be exactly the same size as the screen.'
'\n\n'
'So the Container fills the screen.';
@override
Widget build(BuildContext context) {
return Container(width: 100, height: 100, color: red);
}
}
//////////////////////////////////////////////////
class Example3 extends Example {
final String code = 'Center(\n'
' child: Container(width: 100, height: 100, color: red))';
final String explanation =
'The screen forces the Center to be exactly the same size as the screen,'
'so the Center fills the screen.'
'\n\n'
'The Center tells the Container that it can be any size it wants, but not bigger than the screen.'
'Now the Container can indeed be 100x100.';
@override
Widget build(BuildContext context) {
return Center(
child: Container(width: 100, height: 100, color: red),
);
}
}
//////////////////////////////////////////////////
class Example4 extends Example {
final String code = 'Align(\n'
' alignment: Alignment.bottomRight,\n'
' child: Container(width: 100, height: 100, color: red))';
final String explanation =
'This is different from the previous example in that it uses Align instead of Center.'
'\n\n'
'Align also tells the Container that it can be any size it wants, but if there is empty space it won\'t center the Container. '
'Instead, it aligns the Container to the bottom-right of the available space.';
@override
Widget build(BuildContext context) {
return Align(
alignment: Alignment.bottomRight,
child: Container(width: 100, height: 100, color: red),
);
}
}
//////////////////////////////////////////////////
class Example5 extends Example {
final String code = 'Center(\n'
' child: Container(\n'
' color: red,\n'
' width: double.infinity,\n'
' height: double.infinity))';
final String explanation =
'The screen forces the Center to be exactly the same size as the screen,'
'so the Center fills the screen.'
'\n\n'
'The Center tells the Container that it can be any size it wants, but not bigger than the screen.'
'The Container wants to be of infinite size, but since it can\'t be bigger than the screen, it just fills the screen.';
@override
Widget build(BuildContext context) {
return Center(
child: Container(width: double.infinity, height: double.infinity, color: red),
);
}
}
//////////////////////////////////////////////////
class Example6 extends Example {
final String code = 'Center(child: Container(color: red))';
final String explanation =
'The screen forces the Center to be exactly the same size as the screen,'
'so the Center fills the screen.'
'\n\n'
'The Center tells the Container that it can be any size it wants, but not bigger than the screen.'
'\n\n'
'Since the Container has no child and no fixed size, it decides it wants to be as big as possible, so it fills the whole screen.'
'\n\n'
'But why does the Container decide that? '
'Simply because that\'s a design decision by those who created the Container widget. '
'It could have been created differently, and you have to read the Container documentation to understand how it behaves, depending on the circumstances. ';
@override
Widget build(BuildContext context) {
return Center(
child: Container(color: red),
);
}
}
//////////////////////////////////////////////////
class Example7 extends Example {
final String code = 'Center(\n'
' child: Container(color: red\n'
' child: Container(color: green, width: 30, height: 30)))';
final String explanation =
'The screen forces the Center to be exactly the same size as the screen,'
'so the Center fills the screen.'
'\n\n'
'The Center tells the red Container that it can be any size it wants, but not bigger than the screen.'
'Since the red Container has no size but has a child, it decides it wants to be the same size as its child.'
'\n\n'
'The red Container tells its child that if can be any size it wants, but not bigger than the screen.'
'\n\n'
'The child is a green Container that wants to be 30x30.'
'\n\n'
'Since the red `Container` has no size but has a child, it decides it wants to be the same size as its child. '
'The red color isn\'t visible, since the green Container entirely covers all of the red Container.';
@override
Widget build(BuildContext context) {
return Center(
child: Container(
color: red,
child: Container(color: green, width: 30, height: 30),
),
);
}
}
//////////////////////////////////////////////////
class Example8 extends Example {
final String code = 'Center(\n'
' child: Container(color: red\n'
' padding: const EdgeInsets.all(20.0),\n'
' child: Container(color: green, width: 30, height: 30)))';
final String explanation =
'The red Container sizes itself to its children size, but it takes its own padding into consideration. '
'So it is also 30x30 plus padding. '
'The red color is visible because of the padding, and the green Container has the same size as in the previous example.';
@override
Widget build(BuildContext context) {
return Center(
child: Container(
padding: const EdgeInsets.all(20.0),
color: red,
child: Container(color: green, width: 30, height: 30),
),
);
}
}
//////////////////////////////////////////////////
class Example9 extends Example {
final String code = 'ConstrainedBox(\n'
' constraints: BoxConstraints(\n'
' minWidth: 70, minHeight: 70,\n'
' maxWidth: 150, maxHeight: 150),\n'
' child: Container(color: red, width: 10, height: 10)))';
final String explanation =
'You might guess that the Container has to be between 70 and 150 pixels, but you would be wrong. '
'The ConstrainedBox only imposes ADDITIONAL constraints from those it receives from its parent.'
'\n\n'
'Here, the screen forces the ConstrainedBox to be exactly the same size as the screen, '
'so it tells its child Container to also assume the size of the screen, '
'thus ignoring its \'constraints\' parameter.';
@override
Widget build(BuildContext context) {
return ConstrainedBox(
constraints: BoxConstraints(minWidth: 70, minHeight: 70, maxWidth: 150, maxHeight: 150),
child: Container(color: red, width: 10, height: 10),
);
}
}
//////////////////////////////////////////////////
class Example10 extends Example {
final String code = 'Center(\n'
' child: ConstrainedBox(\n'
' constraints: BoxConstraints(\n'
' minWidth: 70, minHeight: 70,\n'
' maxWidth: 150, maxHeight: 150),\n'
' child: Container(color: red, width: 10, height: 10))))';
final String explanation =
'Now, Center allows ConstrainedBox to be any size up to the screen size.'
'\n\n'
'The ConstrainedBox imposes ADDITIONAL constraints from its \'constraints\' parameter onto its child.'
'\n\n'
'The Container must be between 70 and 150 pixels. It wants to have 10 pixels, so it will end up having 70 (the MINIMUM).';
@override
Widget build(BuildContext context) {
return Center(
child: ConstrainedBox(
constraints: BoxConstraints(minWidth: 70, minHeight: 70, maxWidth: 150, maxHeight: 150),
child: Container(color: red, width: 10, height: 10),
),
);
}
}
//////////////////////////////////////////////////
class Example11 extends Example {
final String code = 'Center(\n'
' child: ConstrainedBox(\n'
' constraints: BoxConstraints(\n'
' minWidth: 70, minHeight: 70,\n'
' maxWidth: 150, maxHeight: 150),\n'
' child: Container(color: red, width: 1000, height: 1000))))';
final String explanation =
'Center allows ConstrainedBox to be any size up to the screen size.'
'The ConstrainedBox imposes ADDITIONAL constraints from its \'constraints\' parameter onto its child'
'\n\n'
'The Container must be between 70 and 150 pixels. It wants to have 1000 pixels, so it ends up having 150 (the MAXIMUM).';
@override
Widget build(BuildContext context) {
return Center(
child: ConstrainedBox(
constraints: BoxConstraints(minWidth: 70, minHeight: 70, maxWidth: 150, maxHeight: 150),
child: Container(color: red, width: 1000, height: 1000),
),
);
}
}
//////////////////////////////////////////////////
class Example12 extends Example {
final String code = 'Center(\n'
' child: ConstrainedBox(\n'
' constraints: BoxConstraints(\n'
' minWidth: 70, minHeight: 70,\n'
' maxWidth: 150, maxHeight: 150),\n'
' child: Container(color: red, width: 100, height: 100))))';
final String explanation =
'Center allow ConstrainedBox to be any size up to the screen size.'
'ConstrainedBox imposes ADDITIONAL constraints from its \'constraints\' parameter onto its child.'
'\n\n'
'The Container must be between 70 and 150 pixels. It wants to have 100 pixels, and that\'s the size it has, since that\'s between 70 and 150.';
@override
Widget build(BuildContext context) {
return Center(
child: ConstrainedBox(
constraints: BoxConstraints(minWidth: 70, minHeight: 70, maxWidth: 150, maxHeight: 150),
child: Container(color: red, width: 100, height: 100),
),
);
}
}
//////////////////////////////////////////////////
class Example13 extends Example {
final String code = 'UnconstrainedBox(\n'
' child: Container(color: red, width: 20, height: 50));';
final String explanation =
'The screen forces the UnconstrainedBox to be exactly the same size as the screen.'
'However, the UnconstrainedBox lets its child Container be any size it wants.';
@override
Widget build(BuildContext context) {
return UnconstrainedBox(
child: Container(color: red, width: 20, height: 50),
);
}
}
//////////////////////////////////////////////////
class Example14 extends Example {
final String code = 'UnconstrainedBox(\n'
' child: Container(color: red, width: 4000, height: 50));';
final String explanation =
'The screen forces the UnconstrainedBox to be exactly the same size as the screen, '
'and UnconstrainedBox lets its child Container be any size it wants.'
'\n\n'
'Unfortunately, in this case the Container has 4000 pixels of width and is too big to fit in the UnconstrainedBox, '
'so the UnconstrainedBox displays the much dreaded "overflow warning".';
@override
Widget build(BuildContext context) {
return UnconstrainedBox(
child: Container(color: red, width: 4000, height: 50),
);
}
}
//////////////////////////////////////////////////
class Example15 extends Example {
final String code = 'OverflowBox(\n'
' minWidth: 0.0,'
' minHeight: 0.0,'
' maxWidth: double.infinity,'
' maxHeight: double.infinity,'
' child: Container(color: red, width: 4000, height: 50));';
final String explanation =
'The screen forces the OverflowBox to be exactly the same size as the screen, '
'and OverflowBox lets its child Container be any size it wants.'
'\n\n'
'OverflowBox is similar to UnconstrainedBox, and the difference is that it won\'t display any warnings if the child doesn\'t fit the space.'
'\n\n'
'In this case the Container is 4000 pixels wide, and is too big to fit in the OverflowBox, '
'but the OverflowBox simply shows as much as it can, with no warnings given.';
@override
Widget build(BuildContext context) {
return OverflowBox(
minWidth: 0.0,
minHeight: 0.0,
maxWidth: double.infinity,
maxHeight: double.infinity,
child: Container(color: red, width: 4000, height: 50),
);}
}
//////////////////////////////////////////////////
class Example16 extends Example {
final String code = 'UnconstrainedBox(\n'
' child: Container(color: Colors.red, width: double.infinity, height: 100));';
final String explanation = 'This won\'t render anything, and you\'ll see an error in the console.'
'\n\n'
'The UnconstrainedBox lets its child be any size it wants, '
'however its child is a Container with infinite size.'
'\n\n'
'Flutter can\'t render infinite sizes, so it throws an error with the following message: '
'"BoxConstraints forces an infinite width."';
@override
Widget build(BuildContext context) {
return UnconstrainedBox(
child: Container(color: Colors.red, width: double.infinity, height: 100),
);
}
}
//////////////////////////////////////////////////
class Example17 extends Example {
final String code = 'UnconstrainedBox(\n'
' child: LimitedBox(maxWidth: 100,\n'
' child: Container(color: Colors.red,\n'
' width: double.infinity, height: 100));';
final String explanation = 'Here you won\'t get an error anymore, '
'because when the LimitedBox is given an infinite size by the UnconstrainedBox, '
'it passes a maximum width of 100 down to its child.'
'\n\n'
'If you swap the UnconstrainedBox for a Center widget, '
'the LimitedBox won\'t apply its limit anymore (since its limit is only applied when it gets infinite constraints), '
'and the width of the Container is allowed to grow past 100.'
'\n\n'
'This explains the difference between a LimitedBox and a ConstrainedBox.';
@override
Widget build(BuildContext context) {
return UnconstrainedBox(
child: LimitedBox(
maxWidth: 100,
child: Container(color: Colors.red, width: double.infinity, height: 100),
),
);
}
}
//////////////////////////////////////////////////
class Example18 extends Example {
final String code = 'FittedBox(\n'
' child: Text(\'Some Example Text.\'));';
final String explanation =
'The screen forces the FittedBox to be exactly the same size as the screen.'
'The Text has some natural width (also called its intrinsic width) that depends on the amount of text, its font size, and so on.'
'\n\n'
'The FittedBox lets the Text be any size it wants, '
'but after the Text tells its size to the FittedBox, '
'the FittedBox scales the Text until it fills all of the available width.';
@override
Widget build(BuildContext context) {
return FittedBox(
child: Text('Some Example Text.'),
);
}
}
//////////////////////////////////////////////////
class Example19 extends Example {
final String code = 'Center(\n'
' child: FittedBox(\n'
' child: Text(\'Some Example Text.\')));';
final String explanation = 'But what happens if you put the FittedBox inside of a Center widget? '
'The Center lets the FittedBox be any size it wants, up to the screen size.'
'\n\n'
'The FittedBox then sizes itself to the Text, and lets the Text be any size it wants.'
'\n\n'
'Since both FittedBox and the Text have the same size, no scaling happens.';
@override
Widget build(BuildContext context) {
return Center(
child: FittedBox(
child: Text('Some Example Text.'),
),
);
}
}
////////////////////////////////////////////////////
class Example20 extends Example {
final String code = 'Center(\n'
' child: FittedBox(\n'
' child: Text(\'…\')));';
final String explanation =
'However, what happens if FittedBox is inside of a Center widget, but the Text is too large to fit the screen?'
'\n\n'
'FittedBox tries to size itself to the Text, but it can\'t be bigger than the screen. '
'It then assumes the screen size, and resizes Text so that it fits the screen, too.';
@override
Widget build(BuildContext context) {
return Center(
child: FittedBox(
child: Text(
'This is some very very very large text that is too big to fit a regular screen in a single line.'),
),
);
}
}
//////////////////////////////////////////////////
class Example21 extends Example {
final String code = 'Center(\n'
' child: Text(\'…\'));';
final String explanation = 'If, however, you remove the FittedBox, '
'the Text gets its maximum width from the screen, '
'and breaks the line so that it fits the screen.';
@override
Widget build(BuildContext context) {
return Center(
child: Text(
'This is some very very very large text that is too big to fit a regular screen in a single line.'),
);
}
}
//////////////////////////////////////////////////
class Example22 extends Example {
final String code = 'FittedBox(\n'
' child: Container(\n'
' height: 20.0, width: double.infinity));';
final String explanation =
'FittedBox can only scale a widget that is BOUNDED (has non-infinite width and height).'
'Otherwise, it won\'t render anything, and you\'ll see an error in the console.';
@override
Widget build(BuildContext context) {
return FittedBox(
child: Container(
height: 20.0,
width: double.infinity,
color: Colors.red,
),
);
}
}
//////////////////////////////////////////////////
class Example23 extends Example {
final String code = 'Row(children:[\n'
' Container(color: red, child: Text(\'Hello!\'))\n'
' Container(color: green, child: Text(\'Goodbye!\'))]';
final String explanation = 'The screen forces the Row to be exactly the same size as the screen.'
'\n\n'
'Just like an UnconstrainedBox, the Row won\'t impose any constraints onto its children, '
'and instead lets them be any size they want.'
'\n\n'
'The Row then puts them side-by-side, and any extra space remains empty.';
@override
Widget build(BuildContext context) {
return Row(
children: [
Container(color: red, child: Text('Hello!', style: big)),
Container(color: green, child: Text('Goodbye!', style: big)),
],
);
}
}
//////////////////////////////////////////////////
class Example24 extends Example {
final String code = 'Row(children:[\n'
' Container(color: red, child: Text(\'…\'))\n'
' Container(color: green, child: Text(\'Goodbye!\'))]';
final String explanation = 'Since the Row won\'t impose any constraints onto its children, '
'it\'s quite possible that the children might be too big to fit the available width of the Row.'
'In this case, just like an UnconstrainedBox, the Row displays the "overflow warning".';
@override
Widget build(BuildContext context) {
return Row(
children: [
Container(
color: red,
child: Text('This is a very long text that won\'t fit the line.', style: big)),
Container(color: green, child: Text('Goodbye!', style: big)),
],
);
}
}
//////////////////////////////////////////////////
class Example25 extends Example {
final String code = 'Row(children:[\n'
' Expanded(\n'
' child: Container(color: red, child: Text(\'…\')))\n'
' Container(color: green, child: Text(\'Goodbye!\'))]';
final String explanation =
'When a Row\'s child is wrapped in an Expanded widget, the Row won\'t let this child define its own width anymore.'
'\n\n'
'Instead, it defines the Expanded width according to the other children, and only then the Expanded widget forces the original child to have the Expanded\'s width.'
'\n\n'
'In other words, once you use Expanded, the original child\'s width becomes irrelevant, and is ignored.';
@override
Widget build(BuildContext context) {
return Row(
children: [
Expanded(
child: Center(
child: Container(
color: red,
child: Text('This is a very long text that won\'t fit the line.', style: big)),
)),
Container(color: green, child: Text('Goodbye!', style: big)),
],
);
}
}
//////////////////////////////////////////////////
class Example26 extends Example {
final String code = 'Row(children:[\n'
' Expanded(\n'
' child: Container(color: red, child: Text(\'…\')))\n'
' Expanded(\n'
' child: Container(color: green, child: Text(\'Goodbye!\'))]';
final String explanation =
'If all of Row\'s children are wrapped in Expanded widgets, each Expanded has a size proportional to its flex parameter, '
'and only then each Expanded widget forces its child to have the Expanded\'s width.'
'\n\n'
'In other words, Expanded ignores the preffered width of its children.';
@override
Widget build(BuildContext context) {
return Row(
children: [
Expanded(
child: Container(
color: red,
child: Text('This is a very long text that won\'t fit the line.', style: big))),
Expanded(child: Container(color: green, child: Text('Goodbye!', style: big))),
],
);
}
}
//////////////////////////////////////////////////
class Example27 extends Example {
final String code = 'Row(children:[\n'
' Flexible(\n'
' child: Container(color: red, child: Text(\'…\')))\n'
' Flexible(\n'
' child: Container(color: green, child: Text(\'Goodbye!\'))]';
final String explanation = 'The only difference if you use Flexible instead of Expanded, '
'is that Flexible lets its child be SMALLER than the Flexible width, '
'while Expanded forces its child to have the same width of the Expanded.'
'\n\n'
'But both Expanded and Flexible ignore their children\'s width when sizing themselves.'
'\n\n'
'This means that it\'s IMPOSSIBLE to expand Row children proportionally to their sizes. '
'The Row either uses the exact child\'s width, or ignores it completely when you use Expanded or Flexible.';
@override
Widget build(BuildContext context) {
return Row(
children: [
Flexible(
child: Container(
color: red,
child: Text('This is a very long text that won\'t fit the line.', style: big))),
Flexible(child: Container(color: green, child: Text('Goodbye!', style: big))),
],
);
}
}
//////////////////////////////////////////////////
class Example28 extends Example {
final String code = 'Scaffold(\n'
' body: Container(color: blue,\n'
' child: Column(\n'
' children: [\n'
' Text(\'Hello!\'),\n'
' Text(\'Goodbye!\')])))';
final String explanation =
'The screen forces the Scaffold to be exactly the same size as the screen,'
'so the Scaffold fills the screen.'
'\n\n'
'The Scaffold tells the Container that it can be any size it wants, but not bigger than the screen.'
'\n\n'
'When a widget tells its child that it can be smaller than a certain size, '
'we say the widget supplies "loose" constraints to its child. More on that later.';
@override
Widget build(BuildContext context) {
return Scaffold(
body: Container(
color: blue,
child: Column(
children: [
Text('Hello!'),
Text('Goodbye!'),
],
),
),
);
}
}
//////////////////////////////////////////////////
class Example29 extends Example {
final String code = 'Scaffold(\n'
' body: Container(color: blue,\n'
' child: SizedBox.expand(\n'
' child: Column(\n'
' children: [\n'
' Text(\'Hello!\'),\n'
' Text(\'Goodbye!\')]))))';
final String explanation =
'If you want the Scaffold\'s child to be exactly the same size as the Scaffold itself, '
'you can wrap its child with SizedBox.expand.'
'\n\n'
'When a widget tells its child that it must be of a certain size, '
'we say the widget supplies "tight" constraints to its child. More on that later.';
@override
Widget build(BuildContext context) {
return Scaffold(
body: SizedBox.expand(
child: Container(
color: blue,
child: Column(
children: [
Text('Hello!'),
Text('Goodbye!'),
],
),
),
),
);
}
}
//////////////////////////////////////////////////
Nếu muốn, bạn có thể lấy code từ repo GitHub.
Các ví dụ được giải thích trong các phần sau.
Ví dụ 1

Container(color: Colors.red)
Màn hình là cha của Container và nó buộc Container phải có cùng kích thước với màn hình.
Vì vậy, Container sẽ lấp đầy màn hình và sơn màu đỏ.
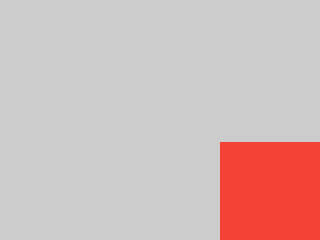
Ví dụ 2
Container(width: 100, height: 100, color: Colors.red)
Container đỏ muốn là 100 × 100, nhưng không được, vì màn hình buộc nó phải có kích thước chính xác như màn hình.
Vì vậy Container sẽ lấp đầy màn hình.
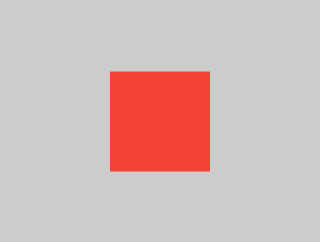
Ví dụ 3

Center(
   child: Container(width: 100, height: 100, color: Colors.red)
)
Màn hình buộc Center phải có cùng kích thước với màn hình, vì vậy Center sẽ lấp đầy màn hình.
Center sẽ cho Container biết rằng nó có thể có kích thước bất kỳ mà nó muốn, nhưng không được lớn hơn màn hình. Bây giờ Container thực sự có thể là 100 × 100.
Ví dụ 4
Align(
   alignment: Alignment.bottomRight,
   child: Container(width: 100, height: 100, color: Colors.red),
)
Điều này khác với ví dụ trước ở chỗ nó sử dụng Align thay vì Center.
Align cũng cho Container biết rằng nó có thể có kích thước bất kỳ mà nó muốn, nhưng nếu có không gian trống, nó sẽ không căn giữa Container. Thay vào đó, nó căn chỉnh vùng chứa ở phía dưới bên phải của không gian có sẵn.
Ví dụ 5
Center(
   child: Container(
      color: Colors.red,
      width: double.infinity,
      height: double.infinity,
   )
)
Màn hình buộc Center phải có cùng kích thước với màn hình, vì vậy Center sẽ lấp đầy màn hình.
Center sẽ cho Container biết rằng nó có thể có kích thước bất kỳ mà nó muốn, nhưng không được lớn hơn màn hình. Container muốn trở thành kích thước vô hạn, nhưng vì nó không thể lớn hơn màn hình nên nó chỉ lấp đầy màn hình.
Ví dụ 6
Center(child: Container(color: Colors.red))
Màn hình buộc Center phải có cùng kích thước với màn hình, vì vậy Center sẽ lấp đầy màn hình.
Center sẽ cho Container biết rằng nó có thể có kích thước bất kỳ mà nó muốn, nhưng không được lớn hơn màn hình. Vì Container không có con và không có kích thước cố định, nó quyết định nó muốn càng lớn càng tốt, vì vậy nó sẽ lấp đầy toàn bộ màn hình.
Nhưng tại sao Container lại quyết định điều đó? Đơn giản vì đó là quyết định thiết kế của những người đã tạo ra widget Container. Nó có thể được tạo theo cách khác và bạn phải đọc tài liệu ontainer để hiểu cách nó hoạt động, tùy thuộc vào hoàn cảnh.
Ví dụ 7
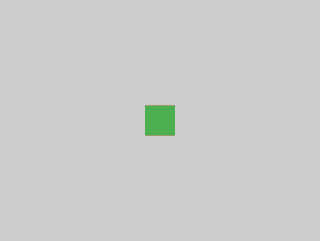
Center(
   child: Container(
      color: Colors.red,
      child: Container(color: Colors.green, width: 30, height: 30),
   )
)
Màn hình buộc Center phải có cùng kích thước với màn hình, vì vậy Center sẽ lấp đầy màn hình.
Center sẽ cho Container đỏ biết rằng nó có thể là bất kỳ kích thước nào nó muốn, nhưng không lớn hơn so với màn hình. Vì Container đỏ không có kích thước nhưng lại chứa con, nên nó quyết định nó muốn có cùng kích thước với con của nó.
Container đỏ nói với con nó rằng nó có thể có kích thước bất kỳ mà nó muốn, nhưng không được lớn hơn màn hình.
Con là Container màu xanh lá cây muốn có kích thước 30 × 30. Cho rằng kích thước của Container đỏ tương ứng với kích thước của con của nó, nên nó cũng là 30 × 30. Màu đỏ không thể nhìn thấy vì Container màu xanh lá cây bao phủ hoàn toàn Container màu đỏ.
Ví dụ 8

Center(
   child: Container(
     color: Colors.red,
     padding: const EdgeInsets.all(20.0),
     child: Container(color: Colors.green, width: 30, height: 30),
   )
)
Container đỏ áp kích thước tương đương với kích thước của con của nó, nhưng nó cũng cân nhắc đến phần đệm (padding) riêng. Vì vậy, nó cũng là 30 × 30 cộng với đệm. Màu đỏ có thể nhìn thấy được là do có phần đệm và Container màu xanh lá cây có cùng kích thước như trong ví dụ trước.
Ví dụ 9
ConstrainedBox(
   constraints: BoxConstraints(
      minWidth: 70,
      minHeight: 70,
      maxWidth: 150,
      maxHeight: 150,
   ),
   child: Container(color: Colors.red, width: 10, height: 10),
)
Bạn có thể đoán rằng Container phải từ 70 đến 150 pixel, nhưng bạn đã nhầm. ConstrainedBox chỉ áp đặt thêm những hạn chế từ những gì nó nhận được từ cha của nó.
Ở đây, màn hình buộc ConstrainedBox phải có cùng kích thước chính xác với màn hình, vì vậy nó yêu cầu Container con của nó cũng giả định kích thước của màn hình, do đó bỏ qua tham số constraints của nó.
Ví dụ 10

Center(
   child: ConstrainedBox(
      constraints: BoxConstraints(
         minWidth: 70,
         minHeight: 70,
         maxWidth: 150,
         maxHeight: 150,
      ),
      child: Container(color: Colors.red, width: 10, height: 10),
   )
)
Bây giờ, Center cho phép ConstrainedBox có kích thước bất kỳ lên đến kích thước màn hình. ConstrainedBox áp đặt thêm những hạn chế từ tham số constraints vào con của nó.
Vùng chứa phải từ 70 đến 150 pixel. Nó muốn có 10 pixel, vì vậy nó phải có 70 (mức tối thiểu).
Ví dụ 11

Center(
  child: ConstrainedBox(
     constraints: BoxConstraints(
        minWidth: 70,
        minHeight: 70,
        maxWidth: 150,
        maxHeight: 150,
        ),
     child: Container(color: Colors.red, width: 1000, height: 1000),
  )
)
Center cho phép ConstrainedBox có kích thước bất kỳ lên đến kích thước màn hình. ConstrainedBox áp đặt thêm những hạn chế từ tham số constraints vào con của nó.
Kích thước Container phải từ 70 đến 150 pixel. Nó muốn có 1000 pixel, vì vậy nó phải có 150 (tối đa).
Ví dụ 12
Center(
   child: ConstrainedBox(
      constraints: BoxConstraints(
         minWidth: 70,
         minHeight: 70,
         maxWidth: 150,
         maxHeight: 150,
      ),
      child: Container(color: Colors.red, width: 100, height: 100),
   )
)
Center cho phép ConstrainedBox có kích thước bất kỳ lên đến kích thước màn hình. ConstrainedBox áp đặt thêm những hạn chế từ tham số constraints vào con của nó.
Kích thước Container phải từ 70 đến 150 pixel. Nó muốn có 100 pixel và đó là kích thước mà nó có được, vì 100 nằm trong đoạn từ 70 đến 150.
Ví dụ 13

UnconstrainedBox(
   child: Container(color: Colors.red, width: 20, height: 50),
)
Màn hình buộc UnconstrainedBox phải có cùng kích thước với màn hình. Tuy nhiên, UnconstrainedBox để cho con của nó là Container có kích thước bất kỳ mà nó muốn.
Ví dụ 14

UnconstrainedBox(
   child: Container(color: Colors.red, width: 4000, height: 50),
)
Màn hình buộc UnconstrainedBox phải có cùng kích thước với màn hình và UnconstrainedBox cho phép con của nó Container có kích thước bất kỳ mà nó muốn.
Thật không may, trong trường hợp Container này thì chiều rộng 4000 pixel là quá lớn để vừa với UnconstrainedBox, vì vậy UnconstrainedBox hiển thị "cảnh báo tràn" rất đáng sợ.
Ví dụ 15

OverflowBox(
   minWidth: 0.0,
   minHeight: 0.0,
   maxWidth: double.infinity,
   maxHeight: double.infinity,
   child: Container(color: Colors.red, width: 4000, height: 50),
);
Màn hình buộc OverflowBox phải có cùng kích thước với màn hình và OverflowBox cho phép con của nó Container có kích thước bất kỳ mà nó muốn.
OverflowBox tương tự như UnconstrainedBox; sự khác biệt là nó sẽ không hiển thị bất kỳ cảnh báo nào nếu con không phù hợp với không gian.
Trong trường hợp này, Container có chiều rộng 4000 pixel là quá lớn để vừa với OverflowBox, nhưng OverflowBox chỉ hiển thị nhiều nhất có thể mà không có cảnh báo nào được đưa ra.
Ví dụ 16

UnconstrainedBox(
   child: Container(
      color: Colors.red,
      width: double.infinity,
      height: 100,
   )
)
Điều này sẽ không hiển thị bất cứ điều gì và bạn sẽ thấy lỗi trong bảng điều khiển.
UnconstrainedBox là con của nó có kích thước bất kỳ mà nó muốn, tuy nhiên con của nó là Container lại có kích thước vô hạn.
Flutter không thể hiển thị kích thước vô hạn, vì vậy nó gây ra lỗi với thông báo sau: BoxConstraints forces an infinite width.
Ví dụ 17
UnconstrainedBox(
   child: LimitedBox(
      maxWidth: 100,
      child: Container(
         color: Colors.red,
         width: double.infinity,
         height: 100,
      )
   )
)
Ở đây bạn sẽ không gặp lỗi nữa, bởi vì khi giá trị LimitedBox được cho là vô hạn bởi UnconstrainedBox; nó chuyển chiều rộng tối đa là 100 xuống con của nó.
Nếu bạn thay đổi UnconstrainedBox cho một widget Center thì LimitedBox sẽ không áp dụng giới hạn của nó nữa (vì giới hạn của nó chỉ được áp dụng khi nó ràng buộc vô hạn), và chiều rộng của Container được phép vượt qua 100.
Điều này giải thích sự khác biệt giữa LimitedBox và ConstrainedBox.
Ví dụ 18

FittedBox(
   child: Text('Some Example Text.'),
)
Màn hình buộc FittedBox phải có cùng kích thước với màn hình. Text có một số chiều rộng tự nhiên (còn được gọi là chiều rộng nội tại của nó) phụ thuộc vào số lượng văn bản, kích thước phông chữ của nó, v.v.
FittedBox cho phép Text có kích thước bất kỳ mà nó muốn, nhưng sau khi Text cho biết kích thước của nó là FittedBox, thì FittedBox tỷ lệ với Text cho đến khi nó lấp đầy tất cả chiều rộng có sẵn.
Ví dụ 19

Center(
   child: FittedBox(
      child: Text('Some Example Text.'),
   )
)
Nhưng điều gì sẽ xảy ra nếu bạn đặt FittedBox bên trong một widget Center? Center cho phép FittedBox có kích thước bất kỳ mà nó muốn, lên đến kích thước màn hình.
FittedBox sau đó có kích thước ứng với Text và cho phép Text có kích thước bất kỳ mà nó muốn. Vì cả FittedBox và Text có cùng một kích thước, nên không còn tỷ lệ nữa.
Ví dụ 20

Center(
   child: FittedBox(
      child: Text('This is some very very very large text that is too big to fit a regular screen in a single line.'),
   )
)
Tuy nhiên, điều gì sẽ xảy ra nếu FittedBox nằm bên trong một widget Center nhưng Text lại quá lớn để vừa với màn hình?
FittedBox cố gắng có kích thước bằng Text, nhưng nó không thể lớn hơn màn hình. Do đó, nó giả định kích thước màn hình và thay đổi kích thước Text sao cho vừa với màn hình.
Ví dụ 21

Center(
   child: Text('This is some very very very large text that is too big to fit a regular screen in a single line.'),
)
Ở đây, nếu bạn xóa FittedBox, thì Text sẽ nhận được chiều rộng tối đa của màn hình và ngắt dòng sao cho vừa với màn hình.
Ví dụ 22
FittedBox(
   child: Container(
      height: 20.0,
      width: double.infinity,
   )
)
FittedBox chỉ có thể chia tỷ lệ một widget con bị giới hạn (có chiều rộng và chiều cao không vô hạn). Nếu không, nó sẽ không hiển thị bất kỳ thứ gì và bạn sẽ thấy lỗi trong bảng điều khiển.
Ví dụ 23

Row(
   children:[
      Container(color: Colors.red, child: Text('Hello!')),
      Container(color: Colors.green, child: Text('Goodbye!')),
   ]
)
Màn hình buộc Row phải có cùng kích thước với màn hình.
Cũng giống như một UnconstrainedBox, Row sẽ không áp đặt bất kỳ ràng buộc nào đối với con của nó, và thay vào đó nó sẽ đặt chúng ở bất kỳ kích thước nào chúng muốn. Row sau đó đặt chúng cạnh nhau và bất kỳ không gian thừa nào vẫn còn trống.
Ví dụ 24

Row(
   children:[
      Container(color: Colors.red, child: Text('This is a very long text that won’t fit the line.')),
      Container(color: Colors.green, child: Text('Goodbye!')),
   ]
)
Vì Row sẽ không áp đặt bất kỳ ràng buộc nào đối với các con của nó, nên rất có thể các con có thể quá lớn để phù hợp với chiều rộng có sẵn của Row. Trong trường hợp này, giống như một UnconstrainedBox, Row sẽ hiển thị "cảnh báo tràn".
Ví dụ 25

Row(
  children:[
    Expanded(
      child: Container(color: Colors.red, child: Text('This is a very long text that won’t fit the line.'))
    ),
    Container(color: Colors.green, child: Text('Goodbye!')),
  ]
)
Khi con của Row được bao bọc trong một widget Expanded, thì Row sẽ không để con này xác định chiều rộng của chính nó nữa.
Thay vào đó, nó xác định chiều rộng Expanded theo các phần tử con khác và chỉ khi đó widget Expanded mới buộc phần tử con ban đầu phải có chiều rộng của Expanded.
Nói cách khác, khi bạn sử dụng Expanded, chiều rộng của phần tử gốc sẽ trở nên không liên quan và bị bỏ qua.
Ví dụ 26

Row(
  children:[
    Expanded(
      child: Container(color: Colors.red, child: Text(‘This is a very long text that won’t fit the line.’)),
    ),
    Expanded(
      child: Container(color: Colors.green, child: Text(‘Goodbye!’),
    ),
  ]
)
Nếu tất cả các phần tử Row con của nó được bao bọc trong các widget Expanded, thì mỗi widget Expanded sẽ có kích thước tỷ lệ với thông số flex của nó và chỉ khi đó mỗi widget Expanded mới buộc con của nó phải có chiều rộng của Expanded đó.
Nói cách khác, Expanded bỏ qua chiều rộng mong muốn của các con của nó.
Ví dụ 27
Row(
  children:[
    Flexible(
      child: Container(color: Colors.red, child: Text('This is a very long text that won’t fit the line.'))),
      Flexible(
        child: Container(color: Colors.green, child: Text(‘Goodbye!’))
    ),
  ]
)
Sự khác biệt duy nhất nếu bạn sử dụng Flexible thay thế Expanded chính là Flexible cho phép con của nó có cùng chiều rộng hoặc nhỏ hơn Flexible đó, trong khi Expanded buộc con của nó phải có cùng chiều rộng chính xác của Expanded. Nhưng cả hai Expanded và Flexible bỏ qua chiều rộng của con của chúng khi tự định cỡ.
Lưu ý: Điều này có nghĩa là không thể mở rộng các con
Rowtương ứng với kích thước của chúng. CácRowhoặc là sử dụng chiều rộng của con một cách chính xác, hoặc là bỏ qua nó hoàn toàn khi bạn sử dụngExpandedhoặcFlexible.
Ví dụ 28

Scaffold(
  body: Container(
    color: blue,
    child: Column(
      children: [
        Text('Hello!'),
        Text('Goodbye!'),
      ]
    )
  )
)
Màn hình buộc Scaffold phải có cùng kích thước với nó, vì vậy Scaffold sẽ lấp đầy màn hình. Scaffold cho Container biết rằng nó có thể có kích thước bất kỳ mà nó muốn, nhưng không được lớn hơn màn hình.
Lưu ý: Khi một widget nói với con của nó rằng nó có thể nhỏ hơn một kích thước nhất định, thì ta hiểu rằng widget đã cung cấp các ràng buộc lỏng lẻo cho con của nó.
Ví dụ 29

Scaffold(
  body: SizedBox.expand(
    child: Container(
      color: blue,
      child: Column(
        children: [
          Text('Hello!'),
          Text('Goodbye!'),
        ],
      )
    )
  )
)
Nếu bạn muốn con của Scaffold có cùng kích thước với nó, thì bạn có thể gộp con của nó bằng SizedBox.expand.
Lưu ý: Khi một widget nói với con của nó rằng nó phải có kích thước nhất định, thì ta hiểu rằng widget đã cung cấp các ràng buộc chặt chẽ cho con của nó.
Ràng buộc chặt chẽ so với ràng buộc lỏng lẻo
Bạn có thể nghe nói rằng một số ràng buộc là "chặt chẽ" hoặc "lỏng lẻo", vì vậy bạn nên biết điều đó có nghĩa là gì.
Một ràng buộc là chặt chẽ sẽ cung cấp một khả năng duy nhất, một kích thước chính xác. Nói cách khác, một ràng buộc chặt chẽ có chiều rộng tối đa bằng chiều rộng tối thiểu của nó; và có chiều cao tối đa bằng chiều cao tối thiểu của nó.
Nếu bạn truy cập file box.dart của Flutter và tìm kiếm các hàm tạo BoxConstraints, bạn sẽ tìm thấy những thứ dạng như sau:
BoxConstraints.tight(Size size):
  minWidth = size.width,
  maxWidth = size.width,
  minHeight = size.height,
  maxHeight = size.height;
Nếu bạn truy cập lại Ví dụ 2 ở trên, nó sẽ cho chúng ta biết rằng màn hình buộc Container đỏ có cùng kích thước với màn hình. Tất nhiên, màn hình thực hiện điều đó bằng cách chuyển các ràng buộc chặt chẽ cho Container.
Mặt khác, một ràng buộc lỏng lẻo sẽ đặt chiều rộng và chiều cao tối đa, nhưng cho phép widget nhỏ như ý muốn. Nói cách khác, một ràng buộc lỏng lẻo có chiều rộng và chiều cao tối thiểu đều bằng 0:
BoxConstraints.loose(Size size):
  minWidth = 0.0,
  axWidth = size.width,
  minHeight = 0.0,
  maxHeight = size.height;
Nếu bạn truy cập lại Ví dụ 3, bạn sẽ thấy rằng Center cho phép Container đỏ nhỏ hơn, nhưng không lớn hơn màn hình. Tuy nhiên thì Center lại làm được điều đó bằng cách chuyển các ràng buộc lỏng lẻo cho Container. Cuối cùng, Center mục đích chính là chuyển đổi các ràng buộc chặt chẽ mà nó nhận được từ cha của nó (màn hình) thành các ràng buộc lỏng lẻo cho con của nó (Container).
Tìm hiểu quy tắc bố cục cho các widget cụ thể
Nắm được quy tắc bố cục chung là cần thiết, nhưng vẫn chưa đủ.
Mỗi widget có nhiều quyền tự do khi áp dụng quy tắc chung, vì vậy không có cách nào để biết nó sẽ làm gì bằng cách chỉ đọc tên của tiện ích con.
Nếu bạn cố gắng đoán, có thể bạn sẽ đoán sai. Bạn không thể biết chính xác cách một widget hoạt động trừ khi bạn đã đọc tài liệu của nó hoặc nghiên cứu mã nguồn của nó.
Mã nguồn bố cục thường phức tạp, vì vậy tốt hơn hết là bạn nên đọc tài liệu. Tuy nhiên, nếu bạn quyết định nghiên cứu mã nguồn bố cục, bạn có thể dễ dàng tìm thấy nó bằng cách sử dụng khả năng điều hướng của IDE của bạn.
Đây là một ví dụ:
- Tìm đến
Columntrong đoạn mã của bạn và điều hướng đến mã nguồn của nó. Để thực hiện việc này, hãy sử dụngcommand+B(macOS) hoặccontrol+B(Windows/Linux) trong Android Studio hoặc IntelliJ. Bạn sẽ được đưa đến filebasic.dart. VìColumnthừa kế từFlex, nên bạn hãy điều hướng đến mã nguồnFlex(cũng trongbasic.dart). - Cuộn xuống cho đến khi bạn tìm thấy một phương thức được gọi
createRenderObject(). Như bạn có thể thấy, phương thức này trả về mộtRenderFlex. Đây là đối tượng kết xuất choColumn. Bây giờ điều hướng đến mã nguồn củaRenderFlex, sẽ đưa bạn đến fileflex.dart. - Cuộn xuống cho đến khi bạn tìm thấy một phương thức được gọi
performLayout(). Đây là phương thức thực hiện bố cục choColumn.

Bài viết của Marcelo Glasberg.