VueJS: Ví dụ cơ bản với CLI3, Vuex và Axios
V1Study giới thiệu bài viết Ví dụ cơ bản với CLI3, Vuex và Axios. Trong bài viết này ta sẽ sử dụng Vue.js 3.0, Vuex để quản lý state và Axios để gửi yêu cầu HTTP. Trong ví dụ này ta cũng sẽ tìm hiểu cách gửi (dispatch) một action để lấy dữ liệu từ server và sau đó cập nhật state của ứng dụng và hiển thị dữ liệu đó thành thành phần Vue.
Video bài viết:
Mục lục bài viết
- Bước 1: Cài đặt Vue CLI 3
- Bước 2: Cài đặt Vuex, Axios và VueAxios
- Bước 3: Tạo một server JSON để sử dụng dữ liệu
- Bước 4: Tạo store Vuex
- Bước 5: Hiển thị dữ liệu
Bước 1: Cài đặt Vue CLI 3
Mở terminal và tiến hành cài đặt Vue CLI 3 bằng một trong hai lệnh sau:
npm install -g @vue/cli
# hoặc
yarn global add @vue/cli
Tạo một project có tên vuexaxios như sau:
vue create vuexaxio
Chuyển đến project vừa tạo:
cd vuexaxios
Bước 2: Cài đặt Vuex, Axios và VueAxios
Từ terminal ta cài đặt ba thành phần trên bằng lệnh như sau:
npm install vuex axios vue-axios --save
Tiến hành cài đặt bootstrap bằng lệnh sau:
npm install bootstrap --save
Mở file src > App.vue và đưa nội dung sau vào:
<template>
  <section id="app">
    <img width="30%" alt="V1Study logo" src="./assets/logo.png">
    <HelloWorld msg="CHÀO MỪNG BẠN TỚI V1STUDY"/>
  </section>
</template>

<script>
import HelloWorld from './components/HelloWorld.vue';
import '../node_modules/bootstrap/dist/css/bootstrap.min.css';

export default {
  name: 'app',
  components: {
    HelloWorld
  }
}
</script>

<style>
#app {
  font-family: 'Avenir', Helvetica, Arial, sans-serif;
  -webkit-font-smoothing: antialiased;
  -moz-osx-font-smoothing: grayscale;
  text-align: center;
  color: #2c3e50;
  margin-top: 20px;
}
</style>
Mở file src > components > HelloWorld.vue và sửa lại nội dung như sau:
<template>
<section class="hello">
<h1>{{ msg }}</h1>
</section>
</template>
<script>
export default {
name: 'HelloWorld',
props: {
msg: String
}
}
</script>
<style scoped>
h1 {
margin-bottom: 40px
}
</style>
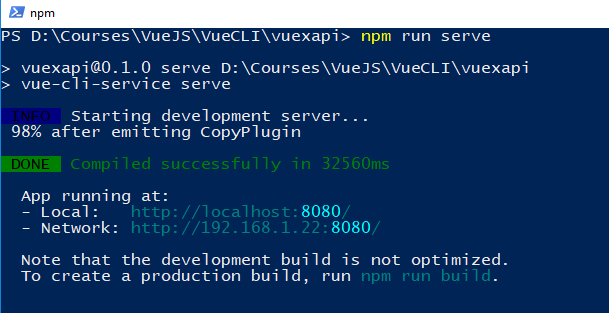
Từ terminal thực hiện lệnh npm run serve, kết quả ta được như sau:
Mở tab mới trên trình duyệt bất kỳ (Chrome chẳng hạn) rồi gõ vào link http://localhost:8080 tại thanh địa chỉ, kết quả ta được:

Bước 3: Tạo một server JSON để sử dụng dữ liệu
Trong ứng dụng web thực tế thì ta có các dữ liệu được lấy từ API. Ở đây ta tạo một file JSON chứa dữ liệu thay cho API bằng cách sử dụng gói json-server.
Ta tạo json-server bằng cách thực hiện một trong 2 lệnh sau:
yarn global add json-server
# hoặc
npm install -g json-server
Trong thư mục src ta tạo một thư mục con có tên data, trong thư mục data này ta tạo một file có tên data.json và đưa nội dung sau vào:
{
    "data": [
        {
           "id": "1",
           "name": "PHP-Laravel",
           "price": "5000"
        },
        {
            "id": "2",
            "name": "Laravel-VueJS",
            "price": "5000"
        },
        {
            "id": "3",
            "name": "PHP",
            "price": "2000"
        },
        {
            "id": "4",
            "name": "Java Core",
            "price": "1500"
        },
        {
            "id": "5",
            "name": "Python",
            "price": "1500"
        },
        {
            "id": "6",
            "name": "mBot level 1",
            "price": "1800"
        },
        {
            "id": "7",
            "name": "Android Core",
            "price": "1800"
        }
    ]
}
Ở đây, mỗi data của ta bao gồm id chứa id khóa học, name chứa tên khóa học và price chứa giá khóa học.
Mở một terminal mới và thực hiện lệnh sau để thử nghiệm file dữ liệu data.json trên:
json-server --watch src/data/data.json --port 1000
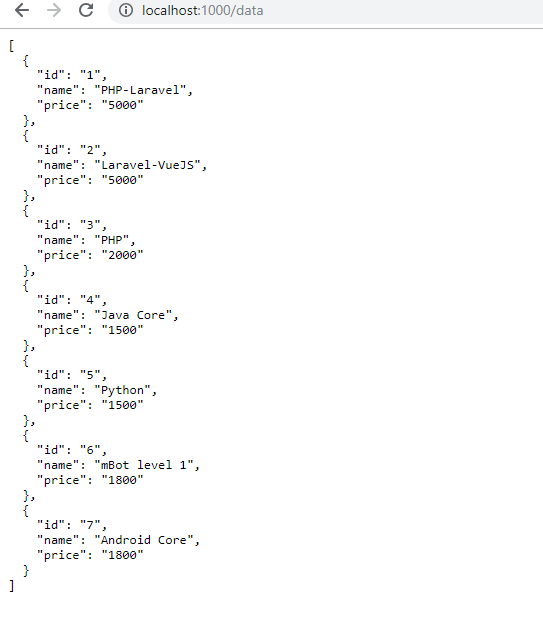
Tạo một tab mới và gõ vào link: http://localhost:1000/data, kết quả ta được:
Bước 4: Tạo store Vuex
Trong thư mục src tạo một thư mục con có tên store, và trong thư mục store tạo một file có tên index.js rồi đưa vào nội dung sau:
// index.js

import Vue from 'vue'
import Vuex from 'vuex'
import axios from 'axios'
import VueAxios from 'vue-axios'

Vue.use(Vuex)
Vue.use(VueAxios,axios)

export default new Vuex.Store({
    state:{
        courses:[]
    },
    actions:{
        loadCourses({commit}){
            axios
            .get('http://localhost:1000/data')
            .then(res=>res.data)
            .then(courses=>{
                commit('SET_COURSES',courses)
            })
        }
    },
    mutations:{
        SET_COURSES(state,courses){
            state.courses=courses
        }
    }
})
store của ta chứa state, actions, và mutations.
state chứa toàn bộ state của ứng dụng.
actions chứa phương thức tên loadCourses dùng để gọi JSON Server (dùng get()) thông qua Axios và lấy lại (dùng then()) dữ liệu trả về (response) cho state thông qua phương thức commit() để gửi dữ liệu tới mutations.
loadCourses() có một đối số là commit và nó sẽ gọi mutations bằng việc sử dụng phương thức commit().
Việc thay đổi state được thực hiện bằng cách commit cho mutation SET_COURSES.
mutations tương tự như các sự kiện: mỗi mutation bao gồm một chuỗi type và một handler. Trình xử lý function là nơi ta thay đổi state thực, trong đó function sẽ nhận state là đối số thứ nhất.
Mở file src > main.js và sửa lại nội dung như sau:
import Vue from 'vue'
import App from './App.vue'
import store from './store/index'
Vue.config.productionTip = false
new Vue({
store,
render: h => h(App),
}).$mount('#app')
Bước 5: Hiển thị dữ liệu
Mở lại file src > components > HelloWorld.vue và sửa lại nội dung thành như sau:
<template>
  <div class="container">
    <table class="table table-striped">
      <thead>
        <tr>
          <th>ID</th>
          <th>Name</th>
          <th>Price</th>
        </tr>
      </thead>
      <tbody>
        <tr v-for="course in courses" :key="course.id">
          <td>{{ course.id }}</td>
          <td>{{ course.name }}</td>
          <td>{{ course.price }}</td>
        </tr>
      </tbody>
    </table>
  </div>
</template>

<script>
import { mapState } from 'vuex'
export default {
  name: 'HelloWorld',
  mounted () {
    this.$store.dispatch('loadCourses')
  },
  computed: mapState([
    'courses'
  ])
}

</script>

<style scoped>
  th{color: blue}
</style>
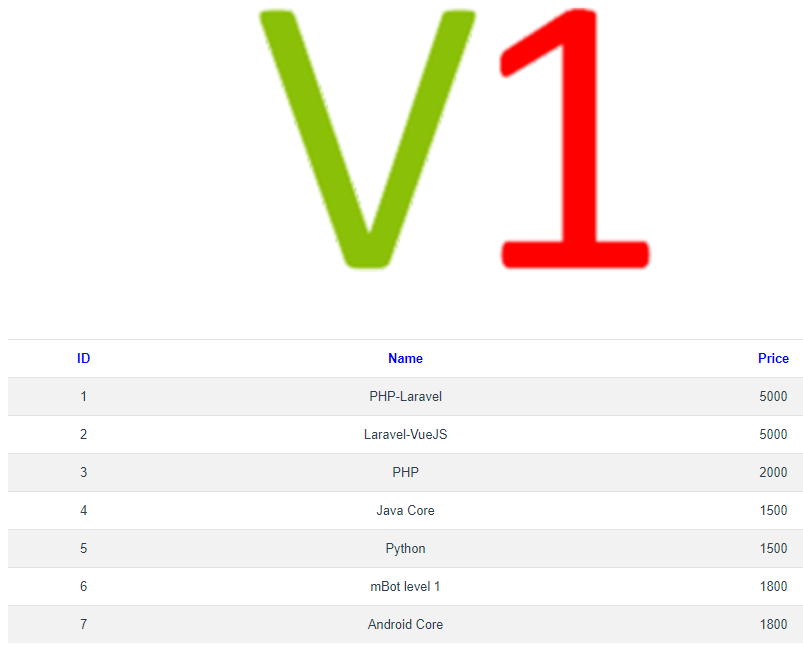
Quay trở lại trình duyệt với link http://localhost:8080 ta sẽ được kết quả như thế này:
Video hướng dẫn: https://youtu.be/THLvUwGet5w
Kết thúc.